Build your own router
Published: 2020-03-04 by Lars guidecode
This blog post will describe a simple router for single page web applications, written on top of Redux and React.

What is routing?
Broadly speaking, routing is a central mechanism in most web applications, which allows the user to see different views (pages) and navigate between these views. Routing integrates with features in the browser: an address bar with a URL and an associated history of previous visited URLs. Because of this close integration with the browser, routing must play well with browser-based features such as sharing a URL and clicking the "back" (and "forward") buttons to navigate to previous views.
Routing must basically provide two mechanisms to your application:
- Conditional rendering (based on current URL)
- User actions to navigate (change current URL)
In the React eco-system, there is a single very popular router, React Router, plus a large number of niche routers. If you don't want to use React Router (see downsides below), and don't want to use a niche library either, why not build your own router?
Below I describe how to write a router that:
- Is simple
- Is configured without JSX
- Make Redux state the single source of truth for location state
With this router you will be able to write applications that does conditional rendering like this:
const routes = {
  '/': <Home />,
  '/signin': <LoginForm />,
  '/profile': <Profile />
};
const App = () => {
  const routeResult = useRoutes(routes);
  return (
    <div className="App">
      {routeResult}
    </div>
  );
};
And navigation like this:
const HomeButton = () => {
  const navigate = useNavigate();
  return (
    <button onClick={navigate('/')}>Home</button>
  );
};
Redux: uni-directional data flow
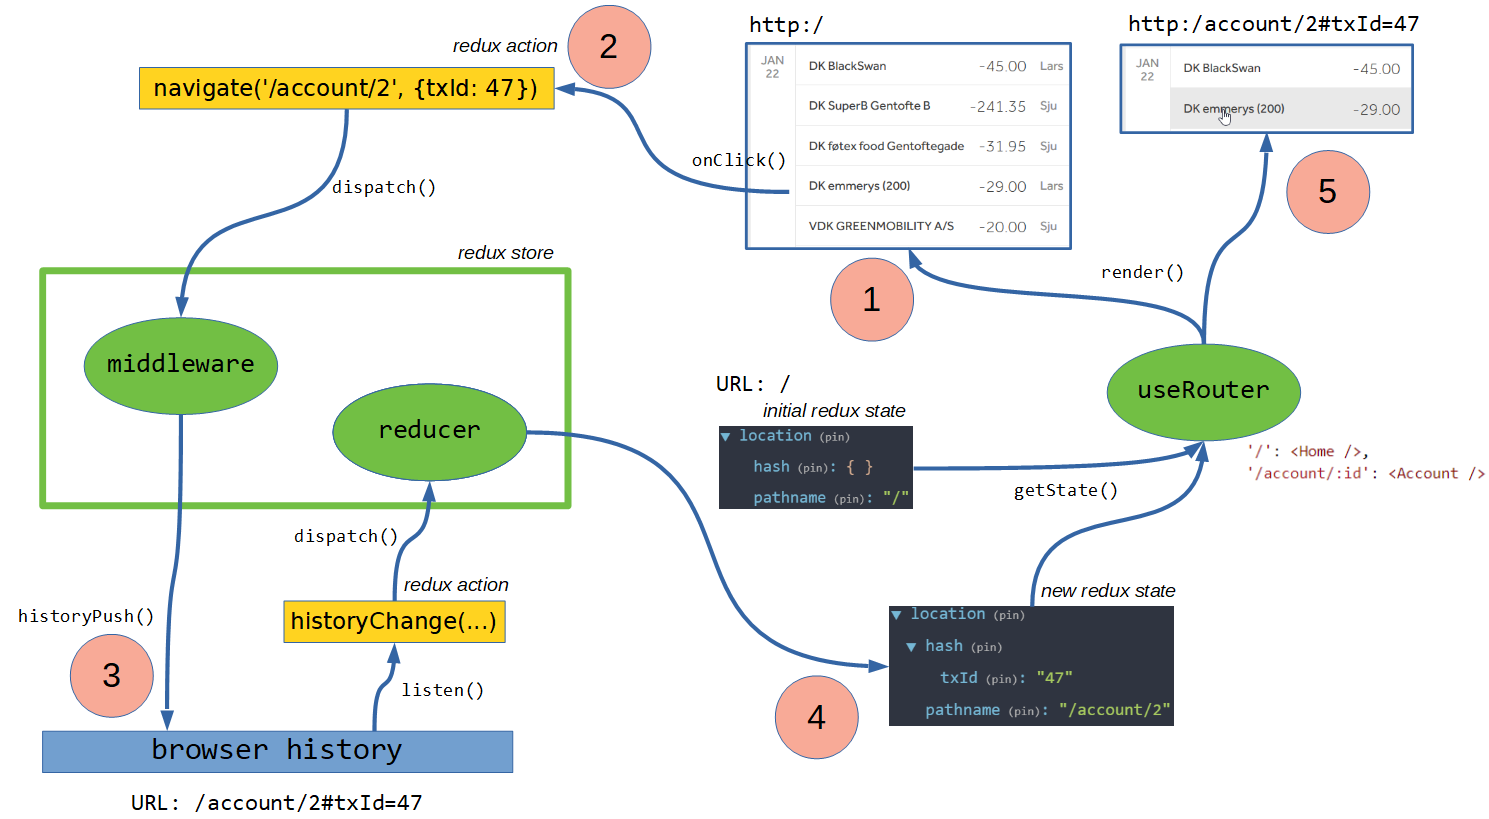
One of the benefits of building your own router is that you can fit it well with your preferred architecture. I prefer to use Redux for managing application state, and I see the current location (URL) as a perfect example of application state, so I really prefer to keep location in my Redux store.
The implementation of our router will:
- Synchronize changes in current location to Redux
state.location. - Render conditionally by subscribing your components to
state.locationwithuseSelector. - Navigate by changing the current URL (which will then synchronize to
state.location).
This implementation fits directly into the unidirectional data flow model of Redux, as you can see in this diagram by Michael Sargent:

Next I will walk through such an implementation. We will use the history module to access the browser's History API. We will also use the query-string module to convert between URL-style strings and more convenient objects. You can find a fully working code example on GitHub.
1. Synchronize current location to Redux store
The History API implements an event that fires whenever the URL changes. We can listen to this event and dispatch a locationChanged action to the Redux store. We should do this right after creating the store and we should also read the initial URL and dispatch an initial locationChanged action:
const store = ...
history.listen(location => store.dispatch(locationChanged(location));
store.dispatch(locationChanged(history.location));
We define the locationChanged action creator using standard Redux action layout:
const locationChanged = payload => ({ type: 'locationChanged', payload });We need a reducer to update the store when a locationChanged action is dispatched. Here is a simple implementation using queryString.parse to give us easy access to the hash and search properties:
const locationReducer = (state, action) => {
  switch (action.type) {
    case 'locationChanged':
      return {
        hash: queryString.parse(action.payload.hash) || {},
        pathname: action.payload.pathname,
        search: queryString.parse(action.payload.search) || {}
      };
    default:
      return state;
  }
};
Finally we need to include this locationReducer when creating the store:
const rootReducer = combineReducers(
  location: locationReducer,
  ...
);
const store = createStore(rootReducer);
This implementation can eventually be improved performance-wise (to avoid unnecessary re-renders) by including checks for equality and only return a new state-object when some properties are un-equal.
2. Render conditionally
We can now simply leverage useSelector from React-Redux to implement conditional rendering. It would look something like this:
const routes = {
  '/': <Home />,
  '/signin': <LoginForm />,
  '/profile': <Profile />
};
const App = () => {
  const pathname = useSelector(state => state.location.pathname);
  return (
    <div className="App">
      {routes[pathname]}
    </div>
  );
};
This implementation supports code-splitting out of the box, using React.lazy like this:
'/profile': React.lazy(() => import('./Profile'))Eventually we might want to encapsulate the routing-specific conditional logic in an abstraction. With such an abstraction we can easily add support for parameterized routes, etc. We would implement this abstraction as a hook, useRoutes, to be able to leverage the automated re-rendering that useSelector ensures whenever the current location changes.
3. Navigate
We could simply navigate by invoking the history API directly, like this:
const HomeButton = () => {
  const navigateHome = () => history.push({ pathname: '/' });
  return (
    <button onClick={navigateHome}>Home</button>
  );
};
However, having side-effects in event handlers like this doesn't feel nice. And since the application will access current location by reading from the Redux store (state.location) the sensible way to change the current location would then be to submit a Redux action to this store, such as this one:
const historyPush = payload => ({ type: 'historyPush', payload });We will not create a normal reducer for this action, because that would require a more complicated two-way synchronization between current URL and state. We are already synchronizing the current URL into state, as described above. Because of that, the easiest way to implement a historyPush Redux action is to write a Redux middleware to convert the action into a call to the history API, like the one above, which will modify the current URL. Such a piece of middleware looks like this:
const locationMiddleware = store => next => action => {
  switch (action.type) {
    case 'historyPush':
      const { hash, pathname, search } = action.payload;
      const location = {
        hash: queryString.stringify(hash || {}),
        pathname: pathname,
        search: queryString.stringify(search || {})
      };
      history.push(location);
    default:
      next(action);
  }
};
This middleware needs to be included when creating the Redux store, like this:
const middleware = compose(applyMiddleware(locationMiddleware));
const store = createStore(rootReducer, middleware);
With this in place, navigation is now done with the usual useDispatch:
const HomeButton = () => {
  const dispatch = useDispatch();
  const navigateHome = () => dispatch(historyPush({ pathname: '/' }));
  return (
    <button onClick={navigateHome}>Home</button>
  );
};
Encapsulating this into a React hook is as easy as:
const useNavigate = () => {
  const dispatch = useDispatch();
  return pathname => ev => {
    ev.preventDefault();
    dispatch(historyPush({ pathname }));
  };
}
And then navigation becomes this straightforward:
const HomeButton = () => {
  const navigate = useNavigate();
  return (
    <button onClick={navigate('/')}>Home</button>
  );
};
Conclusion
Less than 30 lines of Redux reducer and middleware plus a sprinkle of React hooks was all we needed to implement a simple but useful router.
Here is a diagram of the full flow from initial render, through the navigation to a new page based on the sample code.
If you need additional features, such as path matching, nested routing or redirects, these can easily be added.
But: what is wrong with React Router?
First, React Router is probably overkill for most uses. React Router is quite a big library with quite a bit of complexity. If your application needs advanced routing there is a good chance that React Router supports it, but if your routing needs are simple, the complexity might become a liability.
Secondly, React Router uses JSX for route configurations, like this:
<Router>
  <ul>
    <li><Link to="/">Home</Link></li>
    <li><Link to="/about">About</Link></li>
  </ul>
  <Switch>
    <Route exact path="/">
      <Home />
    </Route>
    <Route path="/about">
      <About />
    </Route>
  </Switch>
</Router>
Notice how the routing configuration is mixed with visual components. To me, this is a misunderstanding of the purpose of JSX in React. JSX is for rendering visual components. We don't use <If> components in React, we use JavaScript for that kind of control flow. React Router's <Switch> and <Route> "components" are really a kind of control flow.
Finally, React Router has it's own state management solution, based on React's context. If you are using Redux for managing application state, you want to keep as much application state there, including routing state. React Router does have plugins available to synchronize React Router state to Redux, but those do not appear to be widely used, and will also add further to the complexity of using React Router.
Read more
I learned about Redux-first routing from this excellent blog post.