Front-end testing with Mocha, Vite and Puppeteer
Published: 2021-03-21 by Lars test
Automating our tests for front-end code is a bit more tricky than for back-end code, because of the need to interact with a browser. Our code should run in a browser, and our tests should interact with the code through the browser.
In this article we present a new Node.js tool: mocha-vite-puppeteer, which simplifies a setup with these 3 tools: Mocha for testing, Vite for bundling and Puppeteer for controlling a headless Chromium browser.

By combining these 3 tools we can leverage their respective strengths in an easy-to-use package:
- Vite is very fast.
- Mocha is fast, flexible, feature-rich and widely used.
- Puppeteer and Chromium is very close to being a real browser, while being very robust for automation.
Before we can run tests, we will have written some code (Counter.js) and some tests (Counter.test.js). Using React for the example, it could like this:
Counter.js:
import React, { useState } from "react";

function Counter() {
  const [count, setCount] = useState(0);
  return (
    <button onClick={() => setCount((count) => count + 1)}>
      count is: {count}
    </button>
  );
}

export default Counter;Counter.test.js:
import { expect } from "chai";
import React from "react";
import { render, screen } from "@testing-library/react";

import Counter from "./Counter";

describe("Counter", () => {
  it("should count", () => {
    render(<Counter />);
    const countButton = screen.getByText("count is: 0");
    countButton.click();
    screen.getByText("count is: 1");
  });
});
Then, to run Mocha in the browser, Mocha requires an HTML page which sets up Mocha and imports all our tests. This file should be located in our Vite root directory next to index.html and vite.config.js.
test.html:
<!DOCTYPE html>
<html lang="en">
  <body>
    <script type="module">
      import "mocha";
      mocha.setup({ ui: "bdd" });
    </script>
    <script type="module">
      const modules = import.meta.globEager("/src/**/*.test.{js,jsx}");
    </script>
  </body>
</html>
Here we are utilizing a few features of the Vite bundler:
- The path to Mocha will be automatically resolved by Vite.
- All our test files, as matched by the glob pattern, will automatically be imported.
Now we can simply install and run mocha-vite-puppeteer in the root directory:
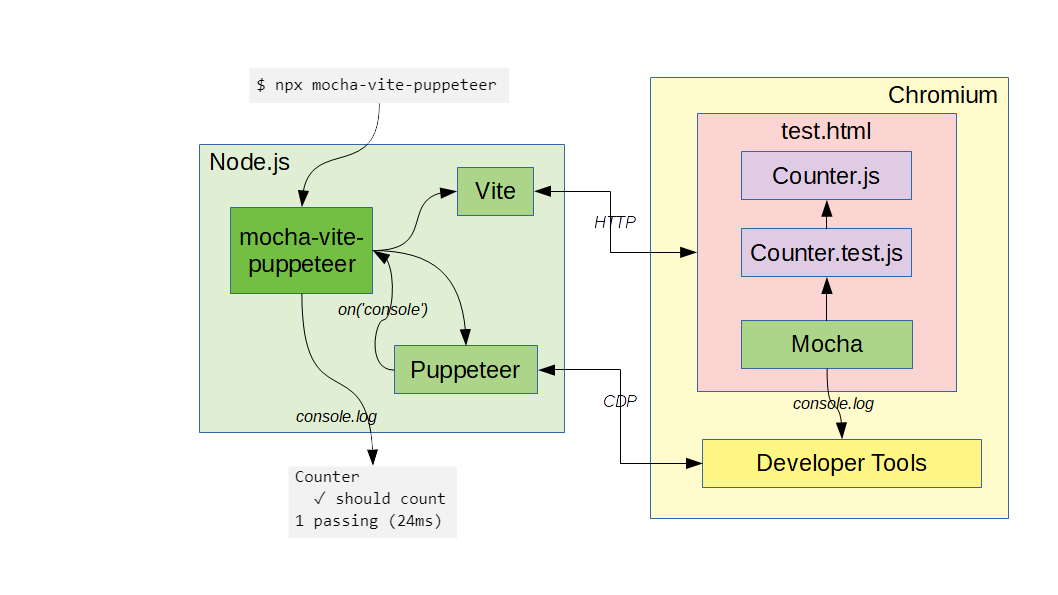
npx mocha-vite-puppeteermocha-vite-puppeteer will go through these steps, as illustrated by the diagram below:
- Start Vite web server with path to Mocha automatically resolved.
- Start Puppeteer, which in turns launches Chromium.
- Configure Puppeteer to forward all
console.log()calls to standard output of the Node.js process. - Ask Puppeteer to load
test.html. - Ask Puppeteer to configure Mocha with a reporter.
- Ask Puppeteer to run Mocha.
- Mocha will call our tests.
- Our tests will call our code.
- Mocha will report test results via
console.log(). - When Mocha is done, Puppeteer and Vite is closed.
When running our tests, the process looks like this:
We can now enjoy fast and robust testing of our front-end code.